
Rebrand + Domain Change Checklist for Social Media, SEO and Ad Grants
Going through a rebrand and/or a domain change is exciting but can also be a nerve-wracking and time-intensive process. To help your nonprofit manage their next rebrand, I will share our checklist for how to change your brand name on Facebook, Instagram and other social media channels, how to manage your Ad Grants through this process and how to manage your SEO during a domain change.
This will be a long post so here are some links to help you jump to your section of interest:
– Changing your brand name on Social Media:
Facebook
Twitter
Pinterest
LinkedIn
YouTube
– Ad Grants domain change process
– SEO checklist for a rebrand and domain change
– Bonus: Google Analytics domain change checklist
– Case Study of SEO recovery after a site migration and rebrand
Social Media rebrand checklist:
NOW:
- Create/Register new Twitter handle and LinkedIn page
- Come up with a strategy for your rebrand campaign, here are some tips for a successful social media campaign
- Prepare assets for rebrand campaign
Upon launch:
- Change page names, usernames, and URLs for Facebook, Twitter, Pinterest and YouTube (instructions below).
- Update Bios / About sections, website URLs, Profile pic, Cover Photo, etc.
- Announce brand name change on all platforms and pin announcement post to top of page when possible
- Request LinkedIn to move your followers to your new page. Once approved:
- Make an announcement on LinkedIn, pin to top of page
- Ask current employees to change their employer on LinkedIn
Here’s how to change names on each platform.
How to change your brand name on Facebook
You’ll need to be an admin to request a change to your Page’s name and username.
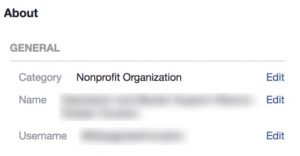
- Click About on the left side of your Page
- Click Edit next to Name and Username
- Make sure to change both (be sure to check out the page name guidelines!)
More info from Facebook here.
How to change your brand name on Twitter
NOW: Register a new account under your desired brand name to make sure no one else can claim it.
Day of launch: Change your new account to something else, change your original account to the new name.
To change your username from twitter.com:
- Click on Settings and privacy from your profile icon drop-down menu.
- Under Account, update the username currently listed in the Username field. Note: If the username is taken, you’ll be prompted to choose another one.
- Click the Save changes button.
Find more information from Twitter here.
How to change your brand name on Pinterest
You can easily change the pinterest username and URL in your profile settings.
How to change your brand name on LinkedIn
If you are making only minor changes to your business name, you will be able to edit your existing page. A minimal name change “generally involves changes to less than five contiguous characters, or changes where the substantive portion of the company name isn’t changing.”
However, if you are rebranding to a completely different name, LinkedIn recommends creating a new Company Page.
Your page admin can request LinkedIn to migrate your followers to your newly rebranded page, as long as it represents the same company and it meets their other requirements. LinkedIn will validate your rebrand by checking your website and social media channels.
It is important to note that LinkedIn will not migrate your employees to the new page, so you’ll have to instruct your existing employees to change their employer information on their own profiles.
Read LinkedIn’s full instructions and requirements here.
How to change your brand name on YouTube
You can easily change your channel name in your YouTube settings. Read the instructions here. You may also want to change your custom URL, which you can do if you have more than 100 subscribers. You will remove your existing URL and claim a new one. A custom URL can be removed up to 3 times per year.
How to manage Ad Grants during a domain change
1-2 weeks prior:
1. Request to add the domain to your Ad Grants here. –If you’re an Ad Grants client of ours, Media Cause will submit this form for you so you can focus on other things.
Note that Google will evaluate your new domain to make sure your purpose stays the same so there will have to be content live on the website before you sent this request, otherwise your request will be denied.
If you have content available on the new domain, we recommend you submit this form two weeks prior, to make sure you can swap over content on the launch day, otherwise you will have to pause your Ad Grants on the launch day and wait for your request to be approved, which can take up to 5 working days.
2. Download your Ad Grants account. You can do this in the AdWords Editor > Account > Export > Export whole account. From this moment, make no more changes to the account until you re-upload on launch day.
3. Replace all the URLs and any mentions of your brand name in ads and ad extensions.
Launch day:
Make sure your domain has been approved before moving forward! If your domain has not yet been approved, make sure to pause all campaigns. Your account can be suspended if you send traffic to a domain that has not yet been approved or a domain that redirects to another domain.
Once the new domain has been approved, re-upload the entire account with the new URLs.
Finally, create two ad groups that target the old brand name and the new brand name to catch any searches for your old name so you can educate people about your brand name change, and to catch any searches for your new brand name if you do not yet show up organically.
Read more of our Ad Grants rebranding tips to make sure you don’t lose your Grant.
SEO checklist for a domain change
Your organic search traffic will likely take a hit during a domain change because it will take time for Google to de-index and re-index your website and for your new domain to gain the same authority your old domain did. However, you can use these best practices to minimize loss in traffic and help you recover, and continue your growth more quickly.
In general, the process according to Google is 4 basic steps:
- Prepare the new site and test it thoroughly.
- Prepare a URL mapping from the current URLs to their corresponding new format.
- Start the site move by configuring the server to redirect from the old URLs to the new ones.
- Monitor the traffic on both the old and new URLs.
You can follow the process in order through the above link as well. And for even more details, read this site migration guide by Moz. It is important to note the following:
Submit Sitemaps
Submitting a sitemap is one of the most important things you can do to help Google recrawl and reindex all of your pages.
- Create a sitemap of the old site
- Submit your old sitemap to Google and Bing to notify the search engines of the change for indexing
- Create and submit a new sitemap to search engines
Basically, you need to submit both sitemaps to Google that contain the old and the new urls to help the crawlers discover the redirects.
Use 301 redirects for all URLs
Maintain your url structure as much as possible and use 301 redirects to pass on most of the SEO value of your old pages to the new respective pages. The more relevant the page, the more link juice will transfer. Keep the redirects as long as possible.
You’ll want to make sure all your old URLs have a 301 permanent redirect (with some exceptions that can get a 404, see below). Here are some tips for implementing a 301 redirect mapping strategy per Neil Patel’s advice:
- Don’t use 302s — the 302 is ment for temporary redirects, you’ll want to use permanent 301 redirects for a permanent site migration.
- Don’t delete pages — If you don’t like a page, you can change the content of the page, or you can redirect it to a different page that most closely represents the old page.
- Create a custom 404 page — Remember that redirects are not just for search engines but also for users. So make sure to create a custom 404 page to help people find your new site when links break or for the rare URL that you will leave as a 404. You may want to leave pages that have received toxic link juice and/or a Google penalty as a 404 to make sure you don’t pass on any toxic link juice. Redirects will pass on the good as well as the bad juice.
Moz Site Migration Guide explains in detail how you can map your URLs.
Update your internal and external links
- Change the internal links on the new site from the old URLs to the new URLs. Redirects are ment for external sources mostly but you should clean up your own site as much as possible. Also make sure to update:
- Social Media links on Twitter, Facebook, LinkedIn, etc.
- Paid Ads (Ad Grants and other ads)
- Any other links you are able to edit yourself including email signatures, etc.
- Encourage external sites to update incoming links. Check your most important links in Google Analytics’ referral traffic report, Google Search Console, or whichever SEO tool you use to track your backlinks and ask the site owners or page authors to update their links to the new URL. The Moz Site Migration guide has a lot of tips for finding quality links pointing to your site.
- Clean up your 404 pages. This is a great opportunity to clean up your 404s so that they don’t move with you to the new site. Either find a place to redirect each of the pages, clean up broken links and/or contact the referring site.
Make sure to remove any no-index instructions
If you set up robot.txt and no-index tags to block Google from crawling (e.g. your test environment), make sure to remove them before submitting your change of address to Google (see below). If this crucial step is forgotten, your new site will not be indexed and your team will be left wondering why they aren’t receiving any organic search traffic.
Update Google and Bing
Like with any move, you have to inform people of your new address. This is no different with search engines. You’ll want to use Google’s change of address tool and Bing’s Site Move tool to inform them where your site has moved.
Never take down your site
Except for the few minutes as you switch over to your new site, you should never make the old site go offline. Any “coming soon” or “under contruction” pages for extended periods of time will turn off visitors, lead to a decline in traffic before the new site goes live, search engines will stop ranking your pages and it will take more time and be more difficult to get back to your old position after launch.
Monitor your traffic after launch of your new site
Make sure you measure your site performance before, so you can compare it to your traffic after. So always make sure you have Google Analytics and Google Search Console set up for your old and new domain (for instructions on how to move over your GA, see below). Also make sure to make an annotation in Google Analytics on the date of the launch.
- Watch the Google index status (GSC)
Keep an eye on how things are indexing in Google. You want to make sure that Google is indexing your entire site. - Check for crawl errors (GSC)
Once your site is launched, monitor your crawl errors closely. If you see any 404 issues, make a list and fix them. Start with your most important pages. - Watch your traffic (GSC and GA)
Traffic is a critical metric for measuring the success of your new site’s SEO. Keep close tabs on everything that happens with your traffic patterns. Some metrics you may want to look out for:- Traffic: Sessions, pageviews, entrances
- Engagement: Bounce rate, exit rate and pages/session
Here are some other helpful tools, besides Google Analyics and Search Console, you could use to help identify any issues are:
- Google Tag Assistant chrome extension to check that your tags and pixels are installed correctly;
- Page Analytics chrome extension to see on page analytics
- MozBar to check for things like meta data (incl. robots) and page load speed
Google Analytics domain change checklist
So then finally, what about Google Analytics?
Check out this comprehensive post on domain changes and Google Analytics by the Torpedo group.
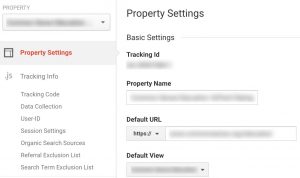
In brief, if your developer team has taken care of the backend and making sure the pixels stay in place, you can just change your name and default URL in the admin settings of Analytics as follows:
- In the Admin panel under Account > Account Settings, change the Account Name
- For each property, go to Property Settings and change the Property Name and Default URL
- For each View, go to View Settings and change the View Name (if necessary) and the website’s URL
- Update your referral exclusion list if applicable.
If you’ve done all of this you should technically be all set. Of course, there is still the aspect of making the announcement to your staff, your audience and your other stakeholders which will require some comprehensive social media campaigns, an Ad Grants campaign, sending out email messages, and more.
Here are some other sources and useful links that I’ve used to create this comprehensive guide that you may want to read for further guidance:
- Google on how to move your site
- How to change domains without losing traffic:
- 301 redirects
Case Study – Site Migration and Rebrand Example
The client for whom we created this SEO migration guide, migrated in the summer of 2016 and because their traffic is highly seasonal, I’ll show you the impact of the migration with their year-over-year growth from the year prior.
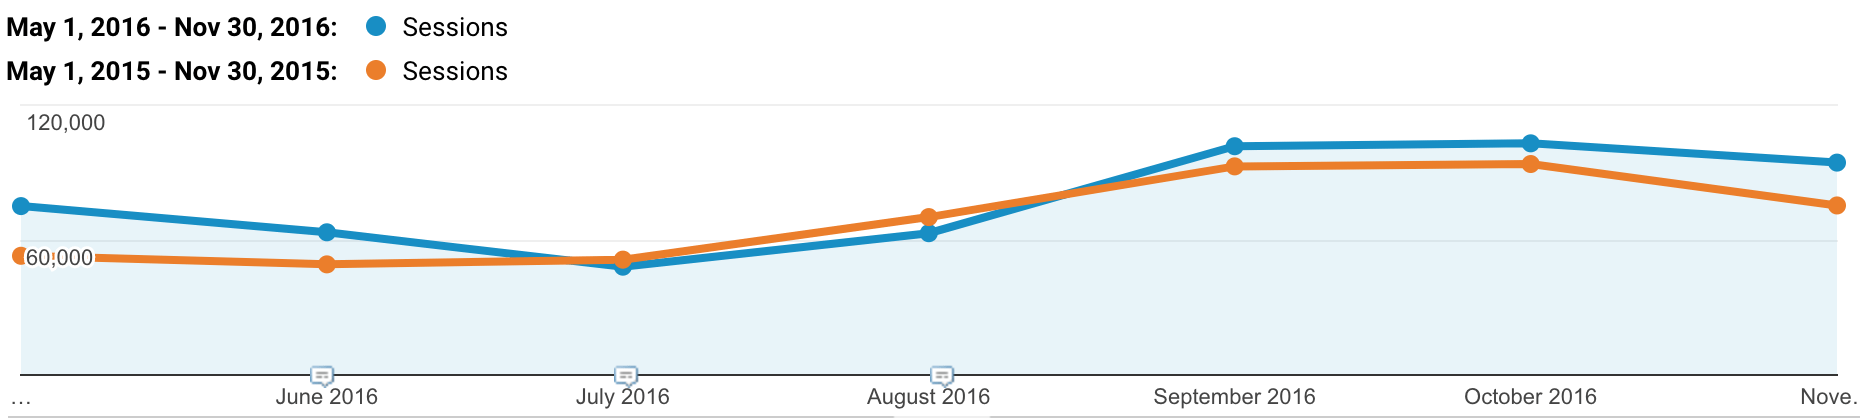
The month prior to launch they had about 29% year-over-year growth. The month of launch (month 0) and the month after (month 1) they saw a year-over-year decline of -6% to -11%. By month 2, they’d recovered and were at a 10% year-over-year growth and by month 4 they were back to 25% year-over-year growth.
At the time of the migration, this client did not change their URL structure or any content on the site other than the brand name and domain. Of course, this is just one example and no two website migrations will be the same.
If you want to know more about the creative process behind a rebrand you might want to check out our creative portfolio and our approach to discovery and persona development.
Looking for strategic and creative guidance for your organization’s rebrand? Get in touch! We’d love to help.