How to Set Up Your Google Ad Grant For Success
The following is a step-by-step guide on how to set your Google Ad Grant account up to drive impact and move your mission forward. If you don’t already have a Google Ad Grant, read our step-by-step guide on applying.
We’ll show you how to properly set up your account to follow Google’s compliance policies, as well as best practices when it comes to developing your ad copy for maximum impact.
What you’ll need to get started:
- Access to your Google Ad Grant account
- Access to your Google Analytics account
- Access to your website’s back end
- (Optional) Media Cause’s Google Ad Keyword Research and Ad Copy Template — a helpful tool to build and edit your campaigns before they go live.
Step 1: Understand How To Structure Your Google Ads Account

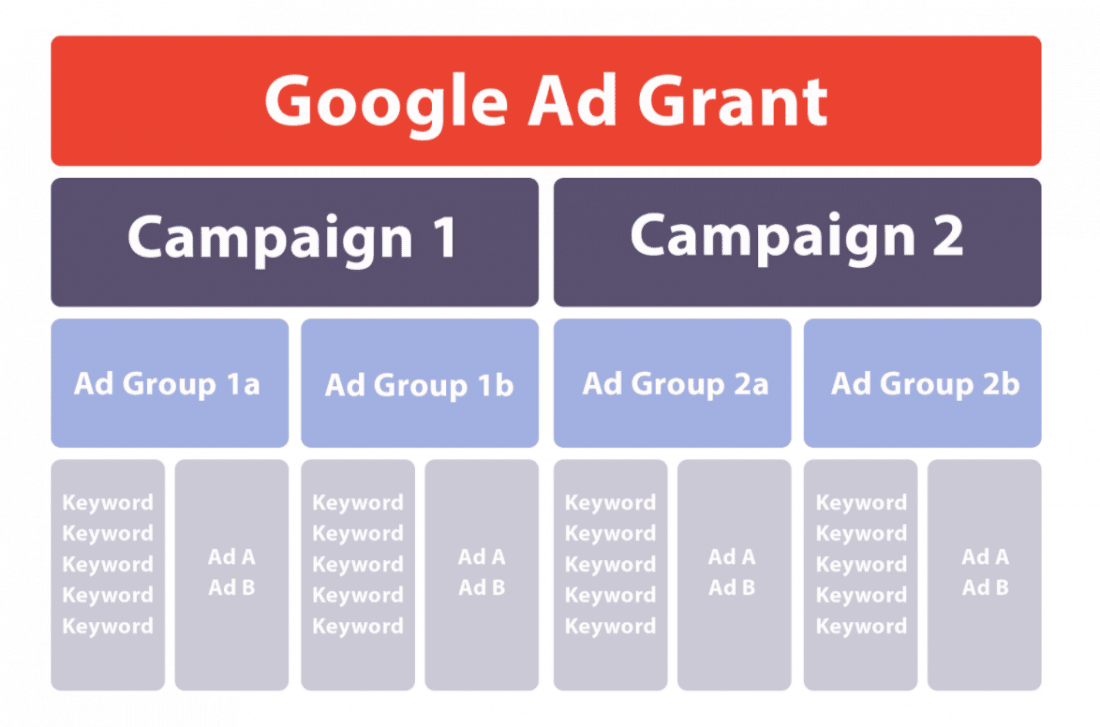
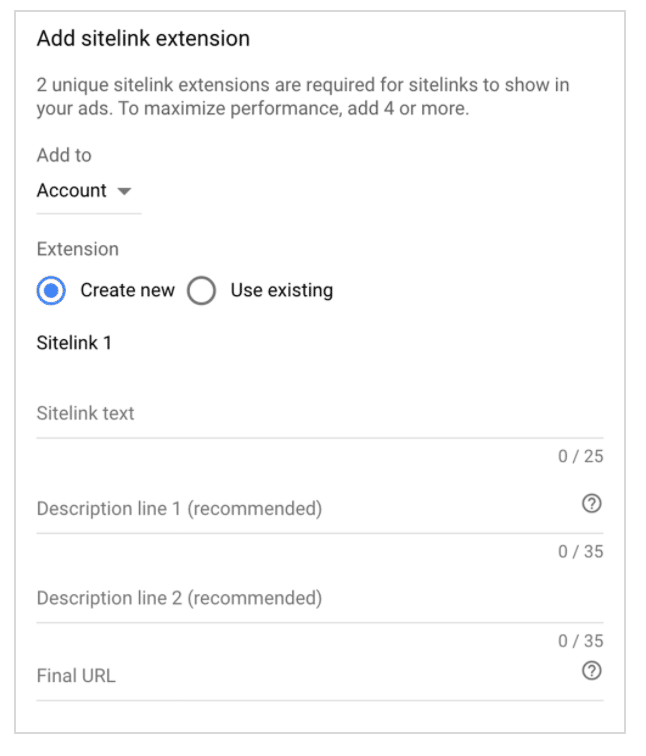
A typical account and campaign setup for Google Ad Grants.
When setting up your Ad Grant account, you’ll want to follow the structure above to ensure that you’re set up for success. You’ll start with your campaigns, which should contain at least 2 ad groups (a Google compliance rule). Those ad groups will share a daily budget, location targeting, and other settings.
Your campaigns and ad groups should contain their own set of keywords which should have a shared common theme. The themes of your campaigns and ad groups typically mirror the content and structure of your website (e.g. Educational Resources for Parents (Campaign) > At-Home Lesson Plans (Ad Group 1) > Setting Up a Home Classroom (Ad Group 2), etc.
You can also organize your ad groups and keywords by things like geography, services, events, keyword match types, product top performers, and more.
Note that within each ad group, you need to have at least 2 active ads — another Google Ad Grant compliance rule.
Step 2: Create Your Campaign
In order to create a new campaign, select “All Campaigns” → “Campaigns” → and click on the “+” plus sign.
Next, click on “New Campaign”. You can name your campaign anything you would like, but it’s easier to organize your account by naming your campaign a broad topic so your ad groups can be more specific to certain content. Note, you can always change the campaign name.
Step 3: Focus on Website Traffic
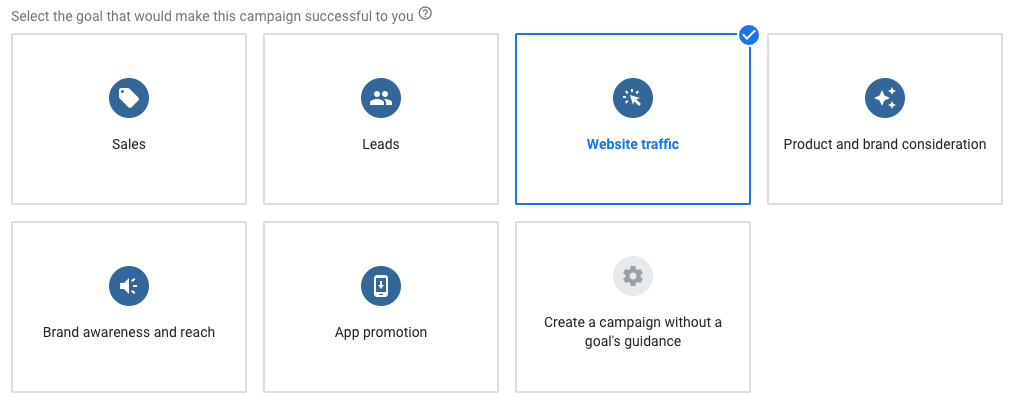
Select “Website Traffic” if you are just setting up your account. You can come back and change this goal later once you have conversion tracking set up and working.
In the beginning, you will want to focus on getting more users to your organization’s website, so you’ll select “website traffic” as the goal of the campaign. This will allow your campaigns to start running more quickly, rather than waiting to collect data to optimize for conversions. Once you have conversion tracking set up and running accurately, you’ll typically want to adjust the campaign goal to “Leads”.
Step 4: Set Accurate Location Targeting
Do you help people in a smaller community or are you a national organization? You want to make sure that the people who are seeing your ads are likely to engage with your organization by signing up for your newsletter or donating to your cause. If someone finds an ad or landing page for an organization that doesn’t serve the area they live in, they likely won’t take these kinds of actions on your website, essentially producing a zero ROI on your Ad Grant.
Pro tip: Add states individually for better targeting and data tracking. This way, you’ll be able to increase or decrease your bids based on better/worse performing states. (To add all 50 states, simply click on “Advanced Search” → “Add locations in bulk”)
Step 5: Set Your Campaign Daily Budget
If you’re building a new Ad Grant account, we recommend setting every campaign to a budget of $330/day (i.e. the maximum amount). This allows you to start building data for your campaigns more quickly. Plus, anything you don’t spend each day is lost forever, i.e. the funds do not roll over.
Once your account is maxing out the daily spend, you can adjust your budgets to your best performing campaigns or ad groups.
Step 6: Create two Ad Groups
In order to remain compliant with Google Ad Grant policies, you will need to create at least 2 ad groups per campaign.
Similar to creating a campaign, you should build ad groups based on content from your website and actions that you want people to take once they land on a given page.
Step 7: Use Relevant, Frequently Searched Keywords
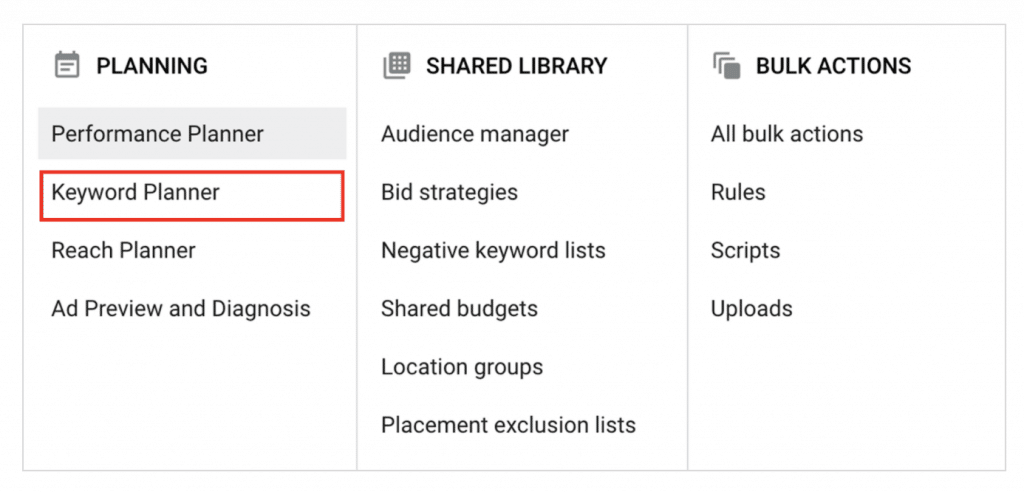
You’ll be able to find the Keyword Planner under the Tools & Setting tab.
Keywords are the backbone of your Google Ad Grant. They determine when your ads show up (and when they don’t) in a Google Search. They also dictate your campaign spend, especially if other organizations are bidding for similar terms.
When exploring and selecting keywords (a.k.a. Keyword Research), Google provides a great tool for you to use. It’s called Keyword Planner, and, in just a few clicks, you can get a sense for how many people are searching for a given topic every month. It will also give you new keyword ideas to consider.
For a more in-depth tutorial on selecting Keywords, be sure to check out our, “How to Choose the Right Keywords for My Campaigns / A.K.A Keyword Research”
Step 8: Utilize 3 Headlines and 2 Descriptions
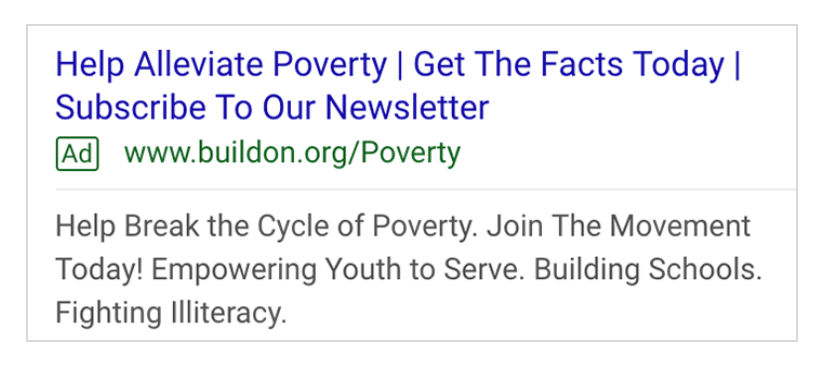
When creating your ad copy, be sure to include a call to action such as “Subscribe To Our Newsletter”.
By including more text on your ads, you not only take up more real estate in the search listing, but you can also give more information to people to find the right audience.
When writing your ad, be sure your copy is related to the keyword or phrase they would have searched. Also, use a call to action like “Sign Up For Our Newsletter” in your headlines and descriptions so people know what to do once they get to the page.
We have some more tips in our, “How to Write Great Ad Copy for Google Ad Grants” tutorial.
Step 9: Add Sitelink Extensions
Sitelinks allows you to give users an opportunity to learn more about your organization through other links that aren’t included on the ad.
Typically, these include links to pages like the, “About Us”, “Our Programs”, “Contact Us” or “Donate Now” pages. They can even go to useful pages for your users, like “FAQs”.
You can create sitelinks on a campaign or Account level.
Add sitelinks to your account. Make sure you include a title and two descriptions, as well as the final URL.
Pro Tip: Use Google Analytics to determine great sitelink ideas – what pages are already popular with your users? And make sure those links are front and center for people looking for your organization on Search.
Step 10: Link Your Google Ad Account to Your Google Analytics Account
One thing that people often miss when they are setting up their Google Ad Grant is to connect it to their Google Analytics account. This not only provides you data from your ads within Analytics, but it’s also a critical step when it comes time to set up your Conversion Tracking, which you’ll learn more about in the next step.
To link your accounts, go to the “Tools & Settings” tab and select “Linked Accounts”. From there, click on “Google Analytics” and click, “Link”.
Step 11: Set Up Conversion Tracking Using Google Goals
Conversion Tracking allows you to see how successful your ads are. A conversion is something you would like a user to do once they are on your website (i.e. donating or signing up for your email list).
While there are many different ways you can set up your conversion tracking, we recommend using Google Goals. You can read more on how to set up conversion tracking and Google Goals here.
 For additional tips on optimizing your Googe Ad Grant, download our free resource, The Ultimate How-To Guide to Google Ad Grants.
Looking for Google Ad Grant Management services? Send us a message here.